Step 1 – Update repositories.
Configuration Iptables
Step 2 – Install iptables-persistent
Step 3 – The below given screen is for selecting IPv4.

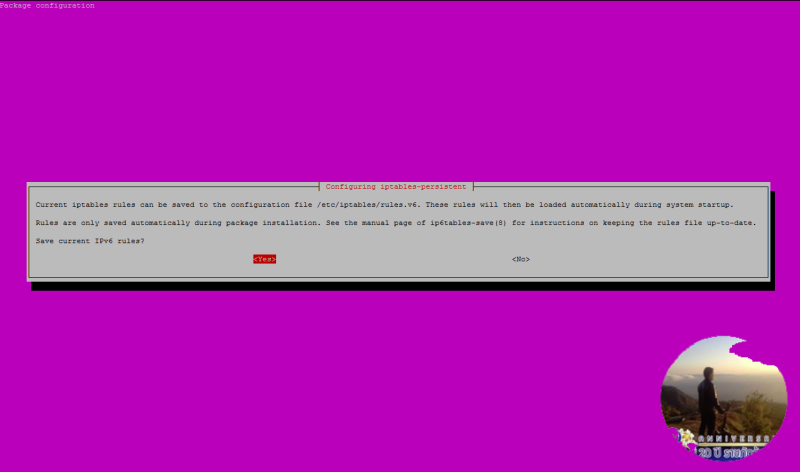
Step 4 – The below given screen is for selecting IPv6(if you do not want to install for IPv6,select no).
Step 5 – Make static IP Address. Open network config file with this command nano /etc/network/interfaces and change the current content for eth0 with this:
#iface enp0s25 inet dhcp
iface enp0s25 inet static
address 192.168.0.1
netmask 255.255.255.0
broadcast 192.168.0.255
gateway 192.168.0.254
dns-nameservers 8.8.8.8 8.8.4.4
Step 6 – Add iptables rules permanent – open network config file nano /etc/network/interfaces add the following line of the end. This is for ip version 4 if you want you can add ip version 6
Step 7 – If you want to block ip address, you can execute the following command.
Step 8 – If you want to block ip address range, you can execute the following command.
Step 9 – If you want to block ip address range but you want to allow access of one ip address from this range, you can execute the following commands.
Step 10 – Save iptables
Step 11 – Show iptables
Chain INPUT (policy ACCEPT)
target prot opt source destination
1 ACCEPT all — 192.168.1.15 0.0.0.0/0
2 DROP all — 192.168.0.0/16 0.0.0.0/0
3 DROP all — 192.168.0.0/16 0.0.0.0/0
4 DROP all — 192.168.1.111 0.0.0.0/0
Step 12 – Delete ip address from iptables. You must see number of ip address. For example I will remove 192.168.1.111
Step 13 – Save iptables agein.
Basic Configuration Fail2ban
Step 14 – Install Fail2banfail2ban.
Step 15 – Backup config file
Step 16 – Open config file.
Step 17 – Config DEFAULT section.
1 – ignoreip:, by default only 127.0.0.1 is whitelisted. You should also add your Local IP addresses into the ignoreip
2 – bantime: – the ban time (in seconds). You can use a negative number for permanent ban.
3 – maxretry – the number of failures before an IP get banned.
4 – destemail – the email to which the alerts will be sent. You should put your email address.
Write ‘-1′ for permanently banned
bantime = -1
maxretry = 3
destemail = mslavov@linux-sys-adm.com
Step 18 – Search SSH section and configure it. Your configuration must look like this below. If you want to disable, you must change true to false. In order to permanently ban ip address you have to add the bantime line. If you want to restore ip addresses after restart, you have to add the action line. Action rule ‘iptables-allports’ definition will be shown later in the tutorial.
#logpath = %(sshd_log)s
enabled = true
port = ssh
filter = sshd
action = iptables-allports[name=ssh]
logpath = /var/log/auth.log
maxretry = 2
bantime = -1
Step 19 – Search vsFTPd section and configure. Your configuration must look like this.
#port = ftp,ftp-data,ftps,ftps-data
#logpath = %(vsftpd_log)s
enabled = true
logpath = /var/log/vsftpd.log
port = ftp,ftp-data,ftps,ftps-data
filter = vsftpd
action = iptables-allports[name=vsftpd]
maxretry = 3
bantime = -1
Step 20 – Restart fail2ban.
Advanced Configuration Fail2ban
Step 21 – Add banned ip address after restart. If you don’t do this after restart, you will lose banned ip address. Backup this config file /etc/fail2ban/action.d/iptables-allports.conf.
Step 22 – Open config file with nano /etc/fail2ban/action.d/iptables-allports.conf and change the script with my script. You can download the script iptables-allports.conf
Step 23 – Create a file in which you will save the banned ip address.
Step 24 – Show active fail2ban rules with fail2ban-client status

Step 25 – Show active fail2ban ssh status with fail2ban-client status ssh

Step 26 – If you want to remove ip address from fail2ban rules, you have to open /etc/fail2ban/ip.blacklist file and remove manually ip address. Then you have to show iptables and remove ip address.
Step 27 – Show iptables and see number of ip address which you want to remove.
Step 28 – Remove ip address which you want.
First
“2” is numbber of banned ip address into iptables
Second – You have to open this file /etc/fail2ban/ip.blacklist and remove the ip address which you want to remove.
Third – remove from rule. Below ara commands which you have to use for different chains.

root@mail:/# fail2ban-client set vsftpd unbanip 192.168.0.159
If you don’t do this, the ip address will be banned again after restart.
Step 29 – Check fail2ban status.

5 Theme – How to setup vsFTPd on Ubuntu (Server) 14.04 LTS Step-by-step