Aside from using your hosting’s internal SMTP server to send emails, you can try using Google’s SMTP server as it’s reliable and free. In this tutorial, we will show you how to use Google SMTP and how to send emails using the server.
What is SMTP?
Simple Mail Transfer Protocol (SMTP) is a set of commands that directs the transfer of emails. When you send an email, it will be forwarded from your email client (such as Microsoft Outlook, Gmail, or Mozilla Thunderbird) to the SMTP server. The server will then relay the mail to the recipient’s email server.
The recipient will receive the mail once it’s downloaded from the email server via POP3 or IMAP. There are two types of SMTP servers — internal and external.
Although most hosting providers – like Hostinger offer an internal SMTP server. You can try using an external SMTP server, such as Google’s SMTP server. It provides several benefits that you might want to consider:
- Reliable – Google SMTP server doesn’t use port 25 to avoid spam flagging. Hence, it gives better email deliverability.
- Convenient – you don’t have to set up your own server (if you use VPS).
- Secure – it requires two-factor authentication, and emails will be backed up in Google’s server.
Keep in mind that Google limits outgoing emails to 100/day. Regardless, having 3000 free emails/month is a great deal if your site has low email volumes.
How to Use Google SMTP Server?
In this section, we will show you how to send emails using Google’s SMTP server through a custom domain in Gmail or with a plugin in WordPress.
Before we continue, here is Google’s SMTP details:
- SMTP server: smtp.gmail.com
- SMTP username: Your full Gmail address, such as youremail@gmail.com
- SMTP password: Your Gmail password.
- SMTP port: 465 (SSL)/587 (TLS)
- TLS/SSL: Required.
Using a Custom Domain
If you have a custom email address, the process to connect to Google’s SMTP server is simple. But first, make sure that you have an email address with a custom domain and a Gmail address.
Before proceeding, you need to prepare an App password – which will give your custom email address permission to access a Google account. Make sure that you’ve activated the two-factor authentication on the Gmail address beforehand.
Once you’ve obtained the app password, log in to your Gmail account and follow these steps:
- Navigate to Settings -> Settings.
- Pick the Accounts and Import tab and click on Add another email address.
- A pop-up window will appear. Fill the required information and press the Next Step button.
- Enter Google’s SMTP server, your Gmail address, and the App password you’ve created earlier in the respected fields.
- A verification email will be sent to your custom email address. Open it and click the confirmation link.
That’s it! Now your custom email address has been linked with Google’s SMTP server. You can also start sending emails from the custom address through Gmail.
Using a WordPress Plugin
Alternatively, you can send emails using Google’s SMTP server through a WordPress plugin. There are plenty of SMTP plugins, but in this tutorial, we will show you how to use WP Mail SMTP:
- Access your WordPress admin dashboard and go to Plugins > Add New. Search for the WP Mail SMTP plugin, then Install and Activate it.
- Navigate to WP Mail SMTP -> Settings. Fill in the From Name field and choose Gmail in the Mailer section.
- Don’t forget to check the Return Path checkbox to get notifications each time there’s a delivery issue.
- Scroll down, and you’ll see the Client ID and Client Secret fields. To fill them, you have to create a web application in your Google account.
- Open a new tab, go to Google API Console, and log in with your Google account.
- Click New Project, fill the Project Name, and tap Create.
- In the dashboard, click on Enable APIS And Services, and pick Gmail API.
- Enable the API and click on Create Credentials.
- Answer the questions with Gmail API, Web browser (Javascript), and User data consecutively. Proceed by clicking What credentials do I need?
- A pop up will prompt you to set up OAuth Consent Screen. Click on Set Up Consent Screen.
- Fill the Application Name with your website’s title. Then, fill the Authorized Domain, Application Homepage link, Application Privacy Policy link, and Application Terms of Service link with your site’s address. Click Save.
- In the Credentials page, type in the Name and Authorized JavaScript origins (fill this one with your site’s address). You will then need to enter the Authorized redirect URIs, which you can find in the WP Mail SMTP settings.
- Go back to the WP Mail SMTP settings on your WordPress dashboard and copy the Authorized redirect URI.
- Paste the URL to the Authorized redirect URIs field in the Credentials page. Then, click Create.
- You will see a pop-up window containing the Client ID and Client Secret. Copy both and paste them to the WP Mail SMTP settings page. Don’t forget to press the Save Settings button.
- Press the Allow plugin to send emails using your Google account button next to Authorization.
- Connect your Gmail account and allow your website to manage it.
- Send a test email to make sure that everything works properly.
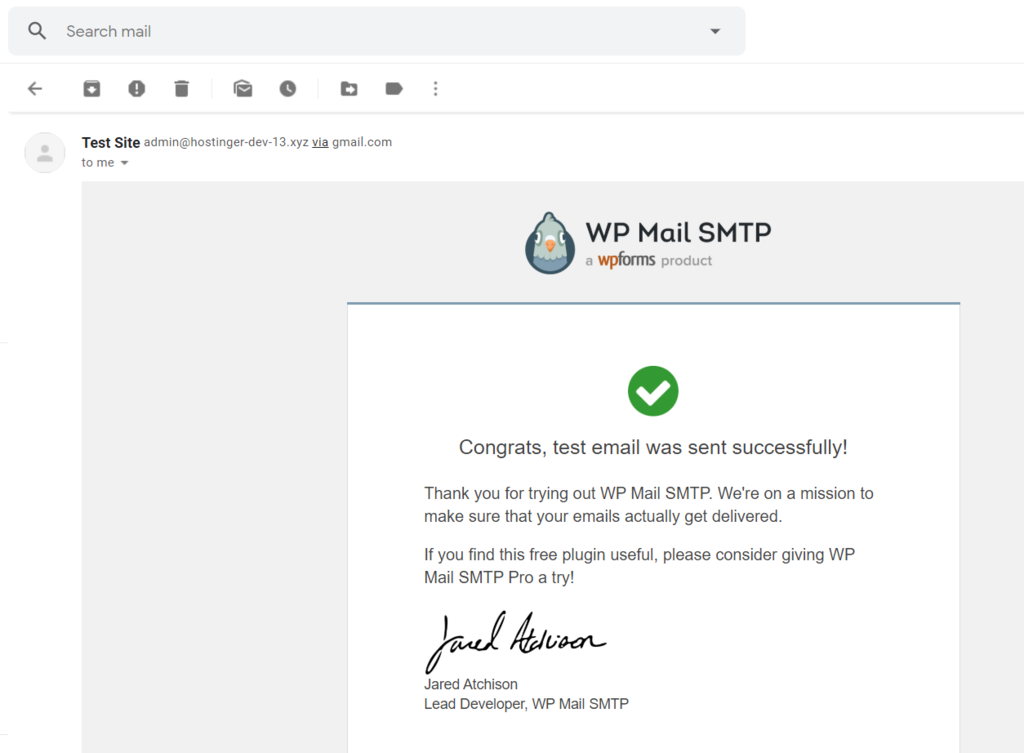
If the email is successfully delivered, it will look like this:
Conclusion
An SMTP server is essential in the mail delivery process — it’s responsible for transferring emails from an email client. That’s why using an external SMTP server like Google SMTP is an excellent choice since it provides a free and reliable solution, especially for sites with low mail volumes.
In this article, you’ve learned how to use the Google SMTP server in two ways — through a custom domain and using a WordPress plugin.
Do you have any questions regarding this topic? Share your thoughts in the comment section below!