Switch# conf t
Switch(conf)#mac address-table static 3408.0499.981c vlan X drop
Switch# conf t
Switch(conf)#mac address-table static 3408.0499.981c vlan X drop
|
1
2
3
4
|
Switch> en
Switch# conf t
Switch(config)# default interface Gi1/0/1
Switch(config)# exit
|
|
1
2
3
4
5
6
7
8
|
Switch> en
Switch# conf t
Switch(config)# interface range gigabitEthernet 1/0/1-47
Switch(if–range)# switchport access vlan 100
Switch(if–range)# exit
Switch(config)# interface gigabitEthernet 1/0/48
Switch(interface)# switchport access vlan 200
Switch(interface)# exit
|
In that example ports 1-47 had a default vlan applied and port 48 had a management vlan applied.
คำสั่ง Privilege ก็เป็นระดับที่ใช้สำหรับการกำหนดสิทธิในการเข้าใช้งานของแต่ละผู้ใช้ ว่าผู้ใช้ในแต่ละระดับนั้นสามารถที่จะใช้คำสั่งใดบนอุปกรณ์ได้บ้าง ซึ่งในการใช้งาน Cisco IOS Software โดยปกติจะมีโหมดในการทำงานอยู่สองระดับ คือ User Exec Mode กับ Privileged Exec Mode และสามารถที่จะกำหนดระดับการใช้งานของผู้ใช้ได้ถึง 16 ระดับ ตั้งแต่ระดับ 0 ซึ่งจะจำกัดการใช้งานไว้มากที่สุด จนถึงระดับ 15 ที่สามารถใช้งานได้ทุกอย่าง
โดย Default ระดับ Privilege level บนอุปกรณ์ Cisco IOS จะมีสิทธิการใช้งาน ดังนี้ Continue reading
example
CoreSW(config)#interface range gigabitEthernet 1/0/25-28
CoreSW(config-if-range)#switchport access vlan 90
CoreSW(config-if-range)#switchport mode access
CoreSW(config-if-range)#exit
CoreSW(config)#exit
CoreSW#wr
Building configuration…
[OK]
ใช้งานได้จริง ตามพี่เขาเลย
xxx-xxx(config)#default interface gigabitEthernetx/x
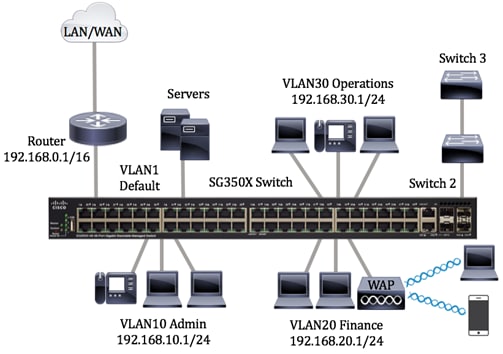
The image below displays an SG350X switch that is configured with the following VLANs:
The following example configures the Fast Ethernet subinterfaces within the range 5/1.1 and 5/1.4 and applies the following VLAN IDs to those subinterfaces:
Fast Ethernet5/1.1 = VLAN ID 301 (vlan-id)
Fast Ethernet5/1.2 = VLAN ID 302 (vlan-id=301 + 2 – 1=302)
Fast Ethernet5/1.3 = VLAN ID 303 (vlan-id=301 + 3 – 1=303)
Fast Ethernet5/1.4 = VLAN ID 304 (vlan-id=301 + 4 – 1=304)
Router(config)# interface range fastethernet5/1.1 - fastethernet5/1.4
Router(config-if)# encapsulation dot1Q 301
Router(config-if)# no shutdown
Router(config-if)#
configure the allowed VLAN for a trunk port, perform this task:
This example shows how to add VLANs 15 to 20 to the list of allowed VLANs on the Ethernet 3/1 Ethernet trunk port:
To display access and trunk interface configuration information, perform one of these tasks: