FTP, short for File Transfer Protocol, is a network protocol that was once widely used for moving files between a client and server. It has since been replaced by faster, more secure, and more convenient ways of delivering files.
Here is the list of some well-known FTP servers.
FTPD
VSFTPD
PROFTPD
PUREFTPD
Introduction to vsftpd
VSFTPD stands for Very Secure File Transfer Protocol Daemon. It is GPL licensed FTP server for UNIX systems, including Linux. It is secure and extremely fast and stable.
Before you remove your MySQL installation, try running the following command from the CLI.
mysql_secure_installation
If a password hasn’t been set for root (for MySQL), that’ll prompt you to set a password and run you through a series of steps to help clean up and secure MySQL (basic security).
Once set, then try running the command below to restart MySQL and see if you receive an error. Continue reading →
One of the first lines of defense in securing your cloud server is a functioning firewall. In the past, this was often done through complicated and arcane utilities. There is a lot of functionality built into these utilities, iptables being the most popular nowadays, but they require a decent effort on behalf of the user to learn and understand them. Firewall rules are not something you want yourself second-guessing.
To this end, UFW is a considerably easier-to-use alternative.
What is UFW?
UFW, or Uncomplicated Firewall, is a front-end to iptables. Its main goal is to make managing your firewall drop-dead simple and to provide an easy-to-use interface. It’s well-supported and popular in the Linux community—even installed by default in a lot of distros. As such, it’s a great way to get started securing your sever.
Before We Get Started
First, obviously, you want to make sure UFW is installed. It should be installed by default in Ubuntu, but if for some reason it’s not, you can install the package using aptitude or apt-get using the following commands:
The objective of this article is to serve as a quick reference guide on how to allow incoming traffic on any TCP or UDP port using Ubuntu 18.04 Bionic Beaver Linux with UFW firewall.
Operating System and Software Versions
Operating System: – Ubuntu 18.04 Bionic Beaver Linux
Requirements
Privileged access to your Ubuntu System as root or via sudo command is required.
Difficulty
EASY
Conventions
# – requires given linux commands to be executed with root privileges either directly as a root user or by use of sudo command
$ – requires given linux commands to be executed as a regular non-privileged user
Instructions
Example 1
Open incoming TCP port 10000 to any source IP address:
$ sudo ufw allow from any to any port 10000 proto tcp
Aside from using your hosting’s internal SMTP server to send emails, you can try using Google’s SMTP server as it’s reliable and free. In this tutorial, we will show you how to use Google SMTP and how to send emails using the server.
The /etc/resolv.conf is the main configuration file for the DNS name resolver library. The resolver is a set of functions in the C library that provide access to the Internet Domain Name System (DNS). The functions are configured to check entries in the /etc/hosts file, or several DNS name servers, or to use the host’s database of Network Information Service (NIS).
On modern Linux systems that use systemd (system and service manager), the DNS or name resolution services are provided to local applications via the systemd-resolved service. By default, this service has four different modes for handling the Domain name resolution and uses the systemd DNS stub file (/run/systemd/resolve/stub-resolv.conf) in the default mode of operation.
The DNS stub file contains the local stub 127.0.0.53 as the only DNS server, and it is redirected to the /etc/resolv.conf file which was used to add the name servers used by the system.
If you run the following ls command on the /etc/resolv.conf, you will see that this file is a symlink to the /run/systemd/resolve/stub-resolv.conf file.
$ ls -l /etc/resolv.conf

lrwxrwxrwx 1 root root 39 Feb 15  2019 /etc/resolv.conf -> ../run/systemd/resolve/stub-r
Unfortunately, because the /etc/resolv.conf is indirectly managed by the systemd-resolved service, and in some cases by the network service (by using initscripts or NetworkManager), any changes made manually by a user can not be saved permanently or only last for a while.
In this article, we will show how to install and use the resolvconf program to set permanent DNS name servers in /etc/resolv.conf file under Debian and Ubuntu Linux distributions.
Why Would You Want to Ddit /etc/resolv.conf File?
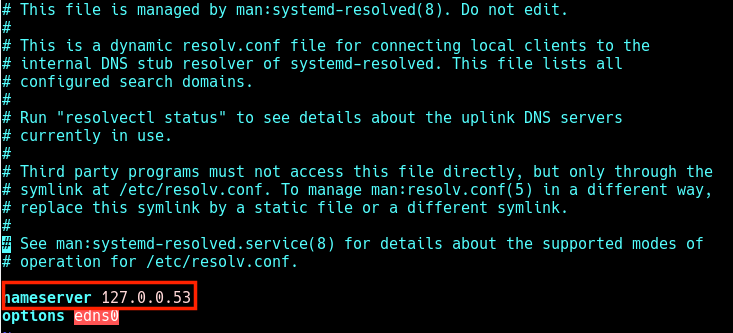
The main reason could be because the systems DNS settings are misconfigured or you prefer to use specific name servers or your own. The following cat command shows the default name server in the /etc/resolv.conf file on my Ubuntu system.
$ cat /etc/resolv.conf
Check DNS Name Servers
In this case, when local applications such as the APT package manager try to access FQDNs (Fully Qualified Domain Names) on the local network, the result is a “Temporary failure in name resolution” error as shown in the next screenshot.
So when a user tries to manually set the name servers, the changes do not last for long or are revoked after a reboot. To resolve this, you can install and use the reolvconf utility to make the changes permanent.
To install the resolvconf package as shown in the next section, you need to first of all manually set the following name servers in the /etc/resolv.conf file, so that you access the FQDMs of Ubuntu repository servers on the internet.
First, update the system software packages and then install resolvconf from the official repositories by running the following commands.
$ sudo apt update
$ sudo apt install resolvconf
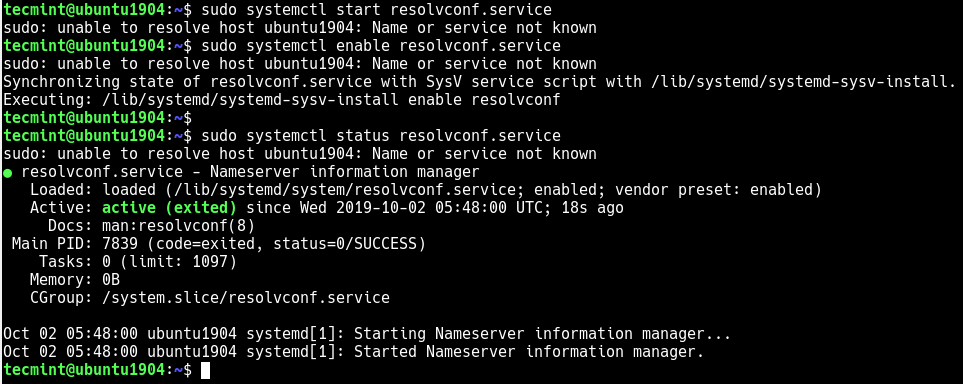
Once the resolvconf installation is complete, systemd will trigger the resolvconf.service to be automatically started and enabled. To check if it is up and running issues the following command.
$ sudo systemctl status resolvconf.service
If the service is not started and enabled automatically for any reason, you can start and enable it as follows.
Set Permanent DNS Nameservers in Ubuntu and Debian
Next, open the /etc/resolvconf/resolv.conf.d/head configuration file.
$ sudo nano /etc/resolvconf/resolv.conf.d/head
and add the following lines in it:
nameserver 8.8.8.8
nameserver 8.8.4.4
Set Permanent DNS Name Servers in Resolvconf
Save the changes and restart the resolvconf.service or reboot the system.
$ sudo systemctl start resolvconf.service
Now when you check the /etc/resolv.conf file, the name server entries should be stored there permanently. Henceforth, you will not face any issues concerning name resolution on your system.
Permanent DNS Name Servers
I hope this quick article helped you in setting the permanent DNS nameservers in your Ubuntu and Debian systems. If you have any queries or suggestions, do share it with us in the comments section below.